Grill Perfect Ribs: A Step-by-Step Guide to Juicy BBQ Ribs
There's a universally acknowledged truth in the world of backyard cuisine: few things rival the sheer delight of biting into perfectly cooked, fall-off-the-bone BBQ ribs. The savory bark, the tender meat, the smoky aroma – it's an experience that tantalizes the senses and gathers loved ones. If you've ever yearned to master the art of making incredible ribs on the grill, transforming tough slabs into tender masterpieces without drying them out or scorching the sauce, you've arrived at the ultimate guide.
This comprehensive article will demystify the process, walking you through every crucial step from selecting the right cut to that glorious final rest. Whether you're a seasoned grill master or firing up your barbecue for the first time, our foolproof method ensures you'll achieve succulent, flavor-packed ribs on the grill that will have everyone asking for your secret. Let's fire up that grill and embark on a culinary journey to BBQ perfection!
Laying the Foundation: Selecting and Preparing Your Ribs
The journey to phenomenal ribs on the grill begins long before the heat is applied. The right preparation ensures your efforts translate into outstanding results.
Choosing Your Champion Ribs: Baby Back vs. Spare
The cut of meat you choose significantly impacts cooking time, flavor, and texture. The two most popular choices for grilling are:
- Baby Back Ribs: These are cut from the loin area, near the backbone. They are shorter, leaner, and generally more tender than spare ribs, with a curving shape. Due to less fat, they cook a bit faster. They offer a delicate, meaty flavor.
- Spare Ribs: Originating from the belly section of the pig, spare ribs are larger, flatter, and meatier. They contain more connective tissue and fat, which renders down beautifully during slow cooking, imparting incredible flavor and moisture. Their longer cook time is well worth the robust taste they deliver. St. Louis style ribs are simply spare ribs that have been trimmed of the sternum bone and cartilage to create a more uniform, rectangular rack, making them easier to cook evenly.
Regardless of your choice, look for fresh ribs with good marbling – streaks of fat interspersed within the muscle. This fat is key to moisture and flavor. Avoid ribs with dry spots or excessive loose meat.
The Essential Membrane Removal
On the bone side of every rack of ribs lies a thin, silvery membrane (also known as "silver skin"). While it might seem insignificant, removing this membrane is a non-negotiable step for truly tender ribs on the grill.
- Why remove it? The membrane is tough and chewy, and it won't break down during cooking. It also acts as a barrier, preventing your delicious dry rub and smoke from penetrating the meat, resulting in less flavorful ribs.
- How to do it: Using a butter knife or the handle of a spoon, gently slide it under the membrane at one end of the rack, between the bone and the membrane. Lift until you have a small section loosened. Then, grab the loosened membrane firmly with a paper towel (this provides grip) and pull steadily across the rack. It should peel off in one satisfying piece. If it tears, simply repeat the process from where it broke.
Crafting the Perfect Dry Rub
A generous dry rub is the secret weapon for building a deep, complex flavor profile that penetrates beyond the surface. While store-bought rubs are convenient, crafting your own allows for customization and often yields superior results. A classic rub often includes:
- Brown Sugar: For sweetness and to promote a beautiful caramelized crust (bark).
- Paprika: Adds color and a mild, earthy flavor. Smoked paprika can enhance smokiness.
- Garlic Powder & Onion Powder: Essential aromatics that provide savory depth.
- Salt & Black Pepper: The foundational seasonings that enhance all other flavors.
- Cayenne Pepper or Chili Powder (Optional): For a touch of heat and a subtle kick.
Mix your chosen ingredients thoroughly. Don't be shy when applying the rub; massage it generously into both sides of the ribs, ensuring every crevice is covered. For optimal flavor infusion, let the seasoned ribs rest at room temperature for 30 minutes, or for an even deeper flavor, wrap them tightly in plastic wrap and refrigerate overnight. This allows the salt to draw out moisture, dissolve, and then reabsorb, carrying the flavors deeper into the meat.
Mastering the Grill: Low and Slow Perfection
The magic of truly tender ribs on the grill happens with a "low and slow" cooking method. This technique breaks down the tough connective tissues, rendering them into gelatin, which creates that desirable succulent texture.
Setting Up for Indirect Heat
Direct heat will quickly burn your ribs and their sugary rub. The key is indirect heat, which mimics the gentle, consistent heat of a smoker. Target a grill temperature between 275°F to 300°F.
- Gas Grill: Light only one or two burners on one side of your grill to medium-low. Place the ribs on the unlit side. Close the lid to allow the heat to circulate.
- Charcoal Grill: Bank your hot coals to one side of the grill. Place a drip pan filled with a little water on the empty side, under where the ribs will go. Position the ribs on the grate above the drip pan.
The goal is a stable, consistent temperature throughout the cook. Consider using an external thermometer to monitor the grill's internal temperature accurately, as lid thermometers can sometimes be inaccurate.
The Art of Slow Smoking and Tenderizing
Once your grill is set up and the temperature is stable, place your ribs, bone-side down, on the cooler side of the grill. Close the lid and let the low and slow process begin. For spare ribs, expect a total cook time of around 5-6 hours; baby back ribs will typically be done in 3-4 hours.
Throughout this initial phase (about 2.5 to 3 hours), resist the urge to constantly peek! Every time you open the lid, you lose precious heat and smoke. Check the grill temperature every 30-45 minutes to ensure it remains within your target range, adjusting burners or vents as needed. For an authentic smoky flavor, add wood chips (like applewood, hickory, or cherry) to a smoker box or directly onto the coals (if using charcoal). Pre-soak wood chips for 30 minutes to an hour to prolong their smoke production.
The "Texas Crutch" (Optional Wrapping for Supreme Tenderness)
After about 2 to 2.5 hours of initial smoking, many pitmasters opt for a technique known as the "Texas Crutch." This involves wrapping the ribs tightly in aluminum foil with a small amount of liquid. This steams the ribs, helping them tenderize even further and push through the "stall" where temperature plateaus. It's particularly useful for achieving that ultra-tender, almost "fall-off-the-bone" texture.
Carefully remove the ribs from the grill. Place each rack on a large sheet of heavy-duty aluminum foil (you might need two sheets for spare ribs). Add a splash of liquid – apple juice, beer, honey thinned with water, or melted butter – to the foil before sealing it tightly. Return the wrapped ribs to the indirect heat section of the grill for another 1 to 1.5 hours. While this method guarantees exceptional tenderness, some purists prefer unwrapped ribs for a slightly firmer bite and a more pronounced bark. For an even deeper dive into this slow-cooking technique, explore our guide on BBQ Ribs on the Grill: Low & Slow Secrets for Perfect Tenderness.
The Grand Finale: Saucing, Resting, and Serving
The final steps transform your already delicious ribs into a glazed, irresistible masterpiece.
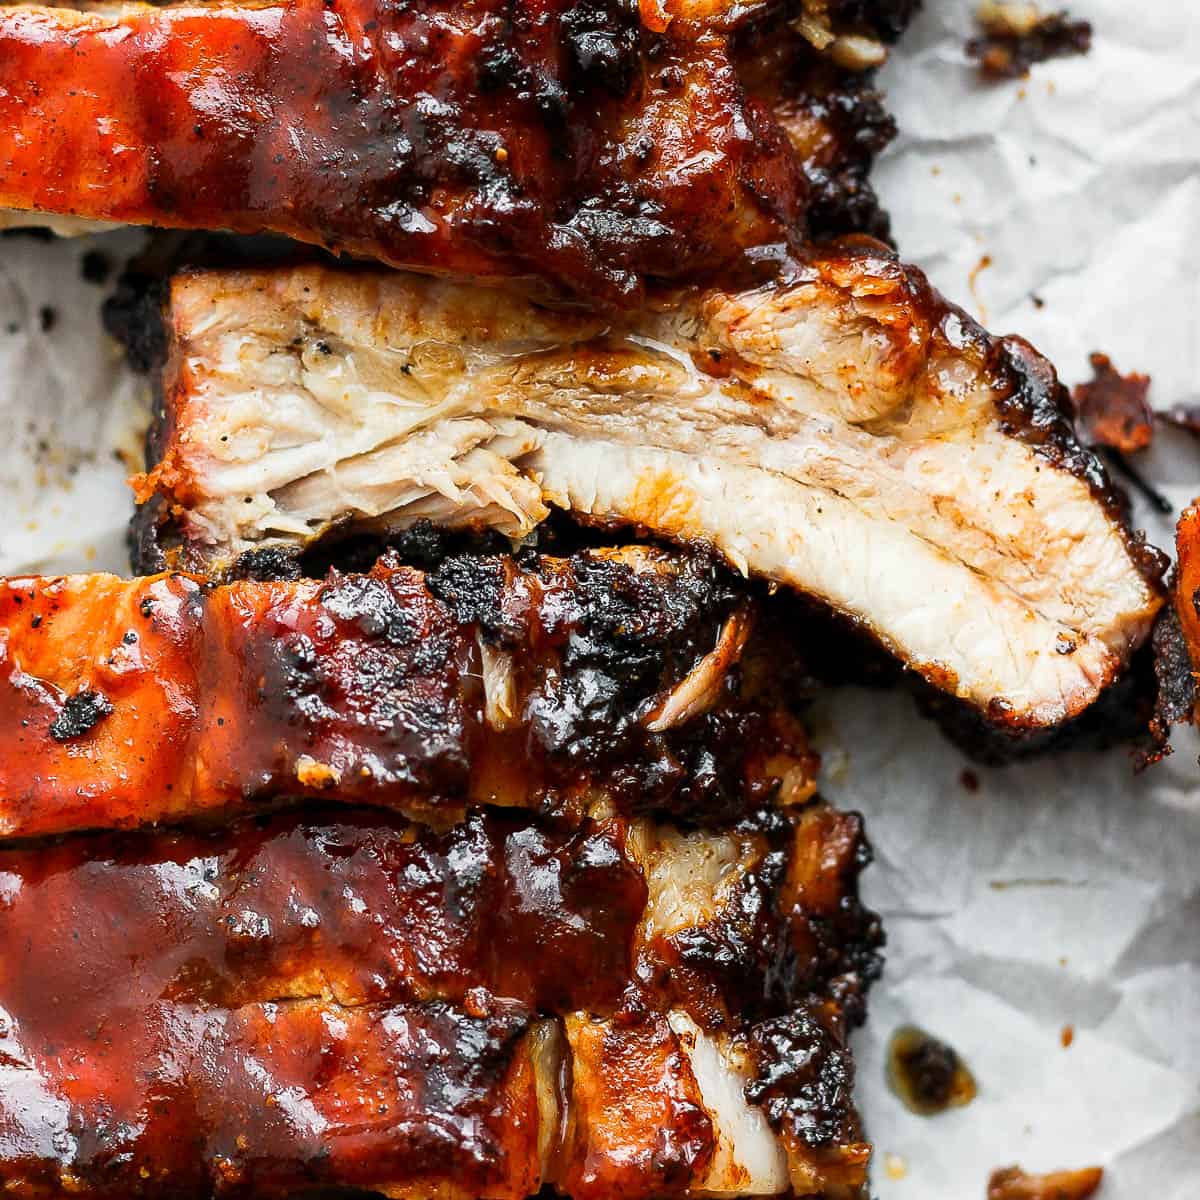
Glazing with BBQ Sauce
Once the wrapped ribs have cooked, carefully unwrap them (watch out for the hot steam!). If you didn't wrap them, proceed directly to this step. It's time to add your favorite BBQ sauce. Apply a generous layer of sauce to both sides of the ribs. Now, move the ribs back to the grill, but this time, you can place them directly over medium heat for about 10-15 minutes, or back on indirect heat if your sauce has a very high sugar content.
Flip the ribs once or twice, applying another layer of sauce each time, allowing it to caramelize and become sticky. Be vigilant during this stage, as the sugar in the sauce can burn quickly. You're aiming for a beautiful, glossy glaze, not a char.
Quick Tip: If you're pressed for time but still crave amazing ribs on the grill, check out our Get Juicy Grilled Ribs Fast: The 4-Hour Quick Method, which offers an alternative for a quicker cook.
Knowing When Your Ribs Are Perfect
There are several reliable indicators that your ribs on the grill are perfectly done:
- The Bend Test: Pick up a rack of ribs from one end with tongs. If the rack bends significantly in the middle and the meat starts to crack on the surface, they're ready.
- Bone Pullback: The meat should have pulled back from the ends of the bones by about ½ to 1 inch.
- Twist Test: Gently twist one of the smaller bones. It should feel loose and easily give way.
- Internal Temperature: While not the sole indicator for ribs (tenderness is key), the internal temperature should reach around 195°F to 203°F. This range indicates that the collagen has broken down sufficiently.
The Crucial Rest and Slice
Once your ribs have reached perfection, remove them from the grill and place them on a cutting board. Cover them loosely with foil and let them rest for 10 to 15 minutes. This seemingly simple step is vital. Resting allows the juices within the meat to redistribute, ensuring every bite is succulent and flavorful. If you cut into them too soon, the juices will run out, leaving you with drier ribs.
After resting, slice the ribs between the bones into individual or two-bone portions. Serve immediately with extra BBQ sauce on the side, alongside classic BBQ accompaniments like cornbread, coleslaw, baked beans, or potato salad for a truly unforgettable meal.
Grilling perfect ribs on the grill doesn't have to be an intimidating endeavor. With the right selection, meticulous preparation, and a commitment to the low and slow method, you can consistently achieve incredibly juicy, tender, and flavorful ribs that will impress everyone at your next barbecue. So fire up that grill, follow these steps, and savor the reward of homemade BBQ perfection!
